Coralbay Strategy: How to Actually Win | Playgridia
Coralbay strategy comes down to one rule: the order you settle creatures in fixes the order your chain fires, permanently, so the two free slots on the left of every band belong to whatever produces a resource, never to whatever spends one. Coralbay has no attacks, no blocking and no way to touch a rival cove, which is relaxing until you lose a close match and cannot say where the points went. This guide is for players who already know the rules: the strong line each tide, the numbers that move the score sheet, and the habits that cost a beginner a match.
Recap, for anyone who wants the full rules first in the Coralbay how-to-play guide: you take exactly ONE thing a turn — work the shallows for food, the reef for pearls, the deep for cards, or settle a creature from your hand. Working a band activates every creature in it, left to right.
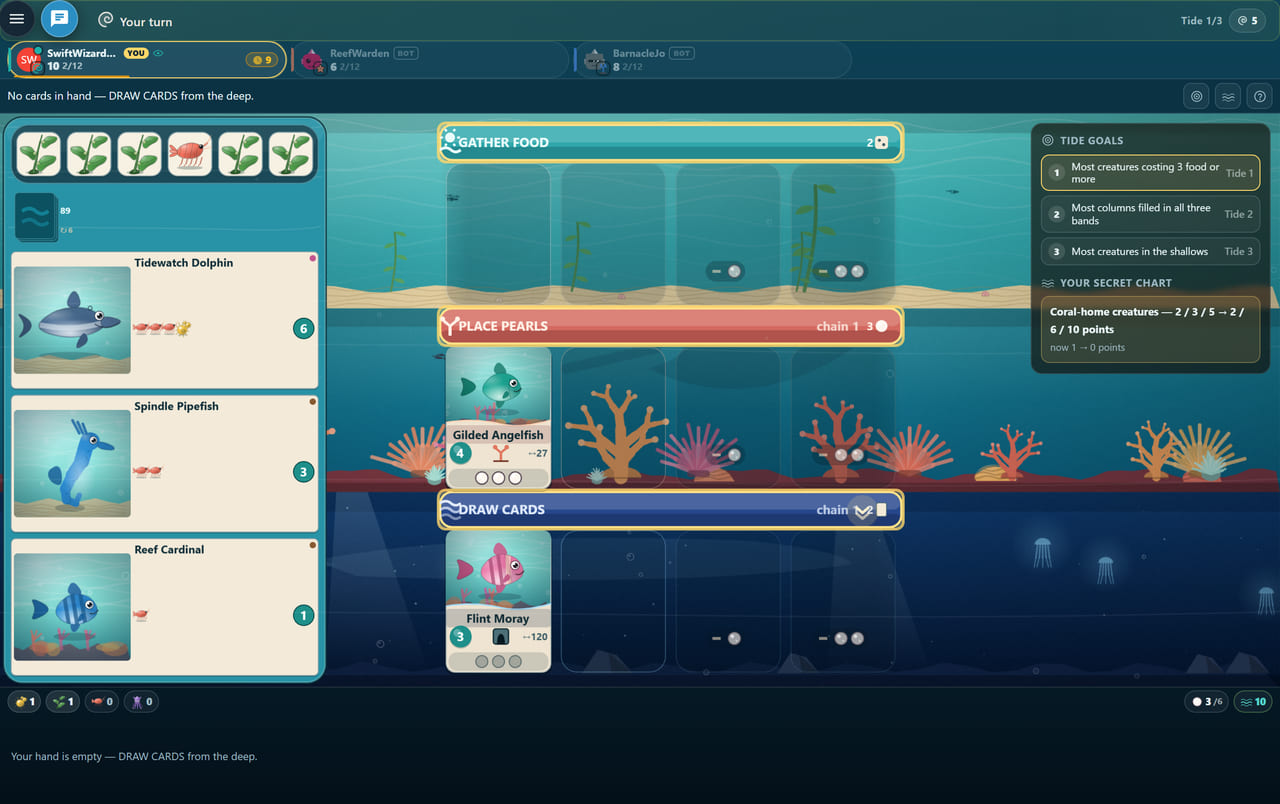
The match is 22 turns, and settling spends one
Classic pace is 9 + 7 + 6 = 22 turns. Your cove has twelve slots, four per band, and here is the number that reframes the game: a typical match fills only six or seven of them. Nobody fills the cove — you are deciding how much machine you can afford before the whistle.
Settling a creature is your whole turn: it pays its food, takes the leftmost free slot of a band that accepts it, and — unless it carries a rare teal power — triggers nothing else. Seven settled creatures is seven of twenty-two turns producing no food, no pearls and no cards, so each one must repay a turn plus its cost before it is even break-even. A one-point creature with a weak brown power, settled in tide 3, is often a turn better spent on the reef.
Your two free columns fire first, and you do not choose them
Slots cost 0, 0, 1 and 2 pearls left to right, and a settling creature always takes the leftmost free slot of its band — together, the game's most important rule: the order you settle in IS the order your chain fires, permanently, and the two slots that fire first cost nothing.
So put your generators on the left: a creature whose brown power hands you food, a card or a pearl belongs early in a band, since everything added later fires after it and feeds on what it just produced. Powers that consume something — a hunter needing a card, a creature stashing food on itself — belong on the right, once earlier links have supplied them. Reverse this and your second creature waits forever for a resource the fourth has already been handed.
What each band pays as it fills, and why the left matters:
| Creatures already in the row | Shallows (food) | Reef (pearls) | Deep (cards) |
|---|---|---|---|
| 0 | 2 food | 2 pearls | 1 card |
| 1 | 2 food + 1 card | 3 pearls | 2 cards |
| 2 | 3 food | 3 pearls + 1 food | 2 cards + 1 pearl |
| 3 or 4 | 4 food | 4 pearls | 3 cards |
The Current wants a full ROW, not a full column
Fill a band to all four slots and the chain does not stop at the edge: the leftmost creature with a brown power in the next band down fires once more, wrapping from the deep back to the shallows. One extra activation, never more.
That is the biggest reason to commit to one band rather than spread three evenly — a full shallows band carrying the Current into the reef is a five-power tap for one action, from then on.
Watch the trap: one shared goal and one secret chart count FULL COLUMNS — a vertical stack, the same slot index in all three bands — pulling the opposite way. A column gets nowhere near the Current; a full row gets at most one column. Decide which you are chasing in tide 1, and do not switch in tide 3.
The reef pays your second-biggest score column — but not on turn one
Pearls are worth one point each, and a typical winning cove finishes with more than twenty — close to a third of a final score that usually lands near seventy, second only to the creatures themselves as a point source.
Two caveats: an empty cove wastes the reef action entirely, since pearls need a creature with room; and pearls are also the currency for slots three and four (see the table above), so every pearl spent there is a point already had. A creature must be worth more than its food cost plus one or two hard points before those slots are correct.
Read all three goals before your first action
All three tide goals are face-up from turn one and scored by RANKING, not threshold. Payouts scale with the table: four seats pay 7, 5, 3 and 1; three seats 7, 4 and 2; head to head, 6 and 2.
A seat measuring zero scores nothing, so even one creature in the right band is worth a race you think is lost, since the worst-placed entrant still banks something. A tie takes the BETTER rank and consumes the one below: match the leader exactly at four seats and you both take the 7, while whoever would otherwise be second drops to the third-place 3, not the second-place 5. Goals are public, so you can read every rival cove and write off a lost race in tide 2, freeing that tide for your own chart.
Colour is timing, and two of the four are rare
Brown (fires when you work the band) is roughly three cards in four — everything above is really about brown powers.
The other three change how you value a card. Teal fires once, at settling, so place it on a turn you can use immediately. Yellow fires free at the end of EVERY tide — settled in tide 1 it pays three times, in tide 3 just once. Pink fires on a rival turn, three times as often as your own at four seats. Yellow and pink together are barely one card in seven, so take one on sight even off-plan.
Four habits that quietly cost ten points
- Hoarding food in the larder. Supply food scores zero at the end and only breaks ties; only food a power has STASHED onto a creature counts. Feeding past what you can spend converts turns into nothing.
- Scouting a hand you cannot pay for. Cards cost 1 to 5 food, most commonly 2 — if unplayable cards pile up, the fix is the shallows, not the deep.
- Ignoring the open-water home. An open-water creature answers every home question, on goals AND your chart — a free match against a coral or grotto objective, and roughly one card in four has it.
- Drafting a chart you then abandon. Worth 5 to 11 points built toward, close to zero ignored. Pick the one your opening two creatures already point at.
What a strong cove looks like at the whistle
Benchmarks from repeated matches: around seven creatures settled, pearls in the twenties, two or three cards tucked into shoals, a final total close to seventy. If your tide-2 pace is well under half that, the cause is almost always too many settle turns and not enough band actions, or a reef track started with nothing to hold a pearl.
Take it to the water: play Coralbay free in your browser, against bots at any difficulty or with friends, no download and no sign-up.
Any third-party brand or game names mentioned are trademarks of their respective owners. Playgridia is an independent platform and is not affiliated with or endorsed by them.
Frequently Asked Questions
What should I do on my first turn in Coralbay?
Almost always take food in the shallows or draw cards in the deep. On an empty cove the reef action does nothing, because there is no creature for pearls to land on and the reward simply vanishes. If your setup draft kept mostly cards, feed first; if it kept mostly food, scout first.
Why does the chain run left to right, and why does that matter?
Working a band triggers its creatures left to right, and a settling creature is placed automatically in the leftmost free slot. So the order you settle in permanently fixes the order your chain fires. Powers that produce a resource belong on the left; powers that consume one belong on the right.
How exactly does the Current work?
Fill all four slots of a band and, every time you work that band, the leftmost creature with a brown power in the next band down triggers one extra time. It wraps from the deep back round to the shallows. It gives exactly one extra activation, never more, and it is the payoff for finishing a band instead of spreading out.
Should I hoard pearls or spend them on slots?
Pearls are worth one point each at the end, and the third and fourth slots cost 1 and 2 pearls respectively, so settling there hands back points you already had. It is usually worth it for a creature that lengthens the chain or completes a band for the Current, and rarely worth it for a weak one-point creature.
Should I enter a tide goal I know I will lose?
Usually yes. A seat measuring zero scores nothing at all, but at a four-seat table even last place pays 1 point and third pays 3. And because a tie takes the better rank and consumes the one below it, matching the leader exactly earns you 7, and the seat who would otherwise have finished second is the one who drops from 5 down to 3.