Catan Trading Strategy: How to Negotiate Better Deals
Catan trading strategy comes down to three habits: tie every trade to a purpose (finishing a build this turn, or shedding cards before a 7), weigh every offer against the bank's and your Trading Posts' ratios first, and never feed the player closing in on the win. This post teaches that haggling through Claimridge, a separate and independent game of the same genre, with its own rules, names and artwork; it shares only the genre with Catan. The boxed game's official rules are in its own rulebook and this post does not replace them; every rule and number below is Claimridge's.
Three price counters: bank, generic post, specific post
The bank is your yardstick, because it needs nobody's agreement. It trades 4:1: give 4 of any good, take 1 of any other. If you own a Village or City on either of a Trading Post's two corners, the ratio drops, and the best available ratio applies on its own. Boards for 2–4 seats have 9 posts: 4 generic and 1 specific per good. Where to settle next to a post is a placement question, covered in the opening strategy post.
| Way to trade | Ratio | What you need | To get 1 Ore, give |
|---|---|---|---|
| Bank | 4:1 | Nothing | 4 Wool |
| Generic Trading Post | 3:1 (any good) | A Village or City on either of the post's two corners | 3 Wool |
| Specific Trading Post | 2:1 (that good only) | The same condition | 2 Wool (at the Wool post) |
| Player offer | Negotiated | The other side's "yes" | For example 1 Wool |
A rule of thumb, advice rather than an engine rule: never accept a player offer worse than your own best ratio. A rival has the bank too, and the posts they own are visible on the board, so price your offer against theirs.
How player offers work here
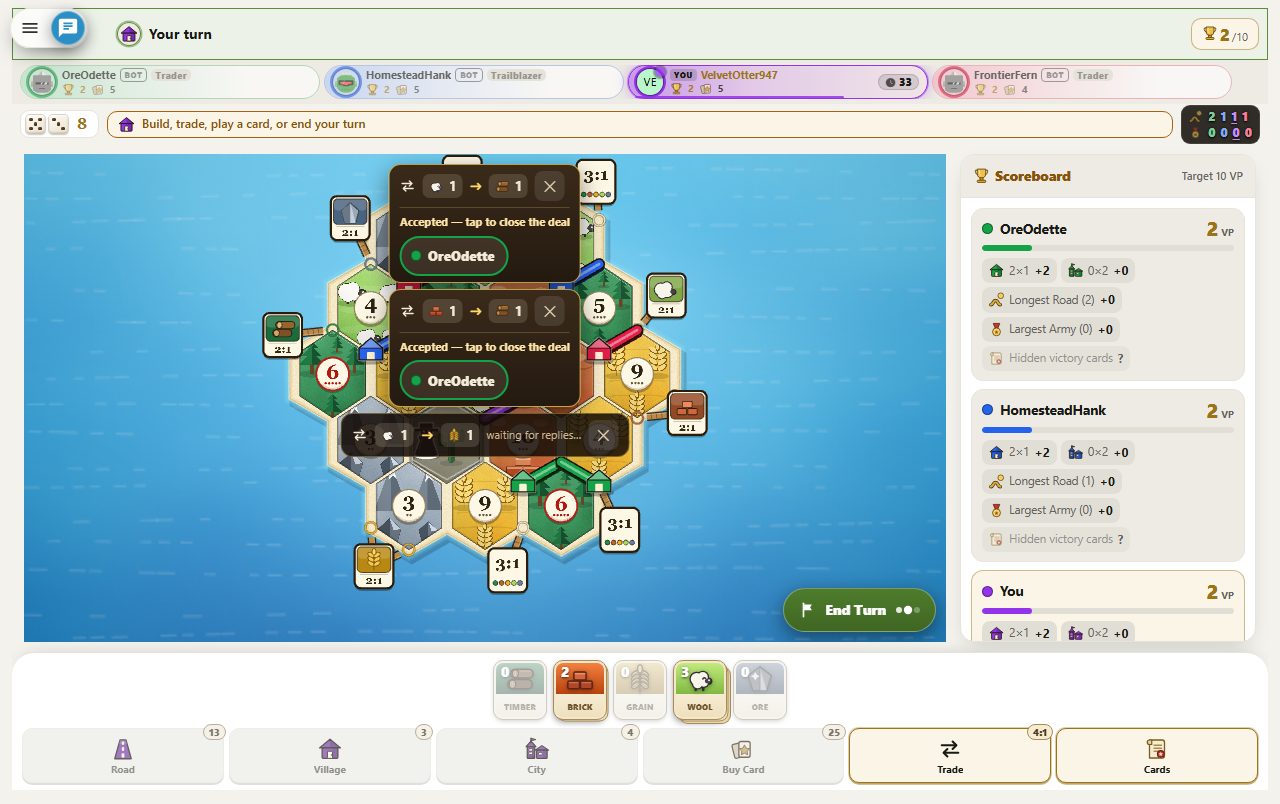
Neither trading nor building works before you roll. After the roll, open the Trade window's Players tab, pick Give and Get, and press Send Offer.
- Up to 3 offers stay open at once. You cannot open the same give/get pair twice, and a good cannot appear on both sides of one offer.
- Every rival sees every offer. A rival who cannot pay sees it too; they just cannot press Accept on their own screen.
- There are three answers: Accept, Decline, or Counter, where the rival writes their own price. They can change their answer while the offer stands.
- You pick the partner. At "Who do you trade with?" a plain accept settles at your price and a counter settles at the counter's price.
- Offers die when the turn ends. If everyone declines, the offer closes. With two seats there is only one rival, so an accept settles on the spot; see the two-player duel guide.
When to trade
To finish a build this turn
A City costs 2 Grain + 3 Ore. With 2 Grain, 2 Ore and 4 Wool you are one Ore short: the bank charges 4 Wool, a generic post 3, the Wool post 2, while a rival might close "give 1 Wool, get 1 Ore" with a single card. Offers that ask only for the missing card are a good habit; Medium bots, too, ask for the 1–2 cards that finish a build. Do not spend the goods you offered while the offer is open: both hands are checked again when it settles, and a good you spent keeps the trade from closing.
To shed extra cards before a 7
On a 7, everyone holding more than the hand limit (7 by default) discards half, rounded down: 8 or 9 cards costs you 4, 10 or 11 costs 5. A 7 can come on anyone's roll and you can only trade on your own turn, so the real protection is ending your turn at or under the limit. Swapping surplus at the bank gives your rival nothing. If the host set the limit to 9 or 12, or turned it off, adjust the arithmetic.
Who not to feed
A player trade helps both sides, including the person you are racing. Three filters worth using:
- Do not feed whoever is closest to the target. The shared scoreboard leaves out hidden Victory Cards, but the win check counts them at once, so the leader may be further along than they look.
- Borrow the Hard bot's line. A Hard bot will not open or accept a trade with a player whose visible score is within 2 points of the target (a visible 8 at a target of 10). That is a bot rule, only advice for you; in reverse, at a table with Hard bots trading closes as you near the target, so plan your last build around the bank and your posts.
- Do not pick the partner on price alone. When several rivals accept or counter, the choice is yours; a Hard bot takes the bidder furthest from winning, and if the price gap is small you can too.
Reading the table: card counts are public, a "no" proves nothing
How many cards each player holds is public; which cards they are is not. A swollen hand means a 7 will cost them half, or that they are saving for a build. Your hand tells the same story, so ending a turn with a short hand is insurance against a 7 and a smaller clue for your rivals.
Do not read a hand from a "no". A rival who cannot pay just cannot press Accept on their own screen, so an answer, or silence, shows nothing. Bots blur it on purpose: Easy 10 percent, Medium 20 percent and Hard 25 percent of the time they say "not this round", and the verdict is the same within a round for the same good asked, so repeating the question will not read a bot's hand. A bot's own offer stays open for a human only about 9 seconds (never more than 14), then the bot picks a partner or withdraws it, so decide quickly.
The cost of hoarding one good: Boom
Boom is one of the Development Cards: name a good and take every copy of it from every rival's hand. It is 2 of the 25 cards at 2–4 seats and 3 of the 36 at 5–6. It costs 1 Grain + 1 Wool + 1 Ore, cannot be played the turn you buy it, counts toward the one card allowed per turn, and comes out after the roll. If the named good is one you do not hold, you lose nothing; if you hold it, you lose all of it. So 6 cards piled in one good can cost more than 3+3 in two.
The same warning covers the hand limit: a piled-up hand is halved on a 7 and is open to Boom.
What to do now? Test these rules by adding a bot and opening a Frontier Valley table in Claimridge: Frontier Valley is always free, and it opens in your phone's browser with no account, download or install. Before ending each turn, check three things: is my hand under the limit, are my open offers better than the bank, and is anyone within 2 points of the target? To see how bots haggle, read playing against the computer; for the rest of mid and late game, the strategy tips; for every rule, how to play; for the genre overview, settlement and resource-trading games.
CATAN® is a registered trademark of CATAN GmbH. Playgridia and Claimridge are not affiliated with, sponsored or endorsed by CATAN GmbH, its licensees or publishers. The name is used only to identify the game readers are searching for and to describe the genre; Claimridge is an independent game with its own rules, names and artwork.
Frequently Asked Questions
What is the quickest way to win at trading in a Catan-style game?
Tie every trade to a purpose: finishing a build this turn, or shedding cards before a 7. In Claimridge the bank's 4:1, a generic Trading Post's 3:1 and a specific post's 2:1 are your floor price, so unless a player offer beats them the bank is often enough. The second rule is not to feed the player closing in on the target. Both are advice, not engine rules.
How many trade offers can I have open at once?
Up to 3. You cannot open the same give/get pair twice, a good cannot appear on both sides of one offer, and offers close when the turn ends. Every rival sees every offer and can accept, decline or write a counter.
Can the player who made a trade offer choose who to trade with?
Yes. If several rivals accept or counter, you pick one at "Who do you trade with?"; a plain accept settles at your price and a counter settles at the counter's price. Both hands are checked again when the deal closes. With two seats there is only one rival, so an accept settles on the spot.
Can bots see the cards in my hand when they trade?
No. Bots read only public information: card counts, buildings, score, posts, road and army counts. The Easy bot never opens an offer; the Medium bot asks for the 1–2 cards that finish a build and counters a near miss; the Hard bot will not trade with a player whose visible score is within 2 points of the target.
Why should I trade before a 7 comes?
When a 7 comes, everyone holding more than the hand limit (7 by default) discards half, rounded down: 4 cards from a hand of 8 or 9, 5 from a hand of 10 or 11. Since you can only trade on your own turn, ending the turn at or under the limit is the safest plan, and swapping the surplus at the bank gives a rival nothing. If the host sets the limit to 9 or 12 or turns it off, the numbers change.